Showing posts with label Linux. Show all posts

2021/02/20

GRUB 2 configuration

I've recently found time and need to improve my GRUB 2 setup and I hope sharing that could help somebody, although it is not something you won't find in other HOWTOs. 

I'm quite conservative and not spending in boot screen much time so all I use is text mode

First of all, the location of onfig files. All the configuration settings are in /etc/default/grub. The settings are used as variables when you generate a new GRUB configuration. The settings there are used whe you generate a new GRUB configuration /boot/grub/grub.cfg with grub-mkconfig command and are all you usually need to change.

If you need to put some custom logic to the generation for the config file, you can achieve that by adding a script into /etc/grub.d directory.

disabling framebuffer

Wher you try to avoid problems with a proprietary driver or just like text mode:

GRUB_TERMINAL_OUTPUT=console


Some information about current framebuffer setup can be found by:
hwinfo | grep -i framebuffer

menu timeout

Setting menu-style timeout, with 5sec countdown:
GRUB_TIMEOUT=5
GRUB_TIMEOUT_STYLE=menu

menu font


GRUB allows to set a custom font. You can create a new GRUB font by converting an existing font with grub-mkfont utility. AFAIK at least TTF and PCF font formats are supported.  

Example of using converted Terminus font in bold weight and 16pt size: GRUB_FONT=/usr/share/grub/terminus16b.pf2

Note that this font is a bitmap one so I had to just chose the proper size and coverte it, when converting TTF fonts you need also provide the desired size.

menu colors

The palette for text-mode colors is quite limited, valid color names are: black, blue, brown, cyan, dark-gray, green, light-cyan, light-blue, light-green, light-gray, light-magenta, light-red, magenta, red, white, yellow.

There are two config options, for setting normal and highlight colors, in format foreground/background: GRUB_COLOR_NORMAL=white/blue GRUB_COLOR_HIGHLIGHT=yellow/light-blue

As it seems these settings are ignored, I created  file /etc/grub.d/99_set_colors with following content to fix that. It's rather simplistic as it does now allow any spaced or quotes around the color values but it does the job:

#!/bin/sh


color_normal=`grep "^GRUB_COLOR_NORMAL" /etc/default/grub | cut -d "=" -f2`

color_highlight=`grep "^GRUB_COLOR_HIGHLIGHT" /etc/default/grub | cut -d "=" -f2`


cat <<EOF

set color_normal=${color_normal}

set color_highlight=${color_highlight}

set menu_color_normal=${color_normal}

set menu_color_highlight=${color_highlight}

EOF

recalling previously selected menu entry


GRUB can save the menu entry you selected last time and use it as default for the next boot:

GRUB_DEFAULT=saved

GRUB_SAVEDEFAULT=true

play tune


If you do not like the waiting for the moment when the GRUB menu is shows up, you can set a tune that will be played just the moment before it appears.


Example with the greeting from the film Close Encounters of The Third Kind: GRUB_INIT_TUNE="480 900 2 1000 2 800 2 400 2 600 3"


You canl find other well-known tunes on internet, e.g. in Linuxmint forum .


2020/06/13

Sharing Files From Linux to Windows VM


I have a Linux workstation and created a Windows virtual machine in it, running on KVM+QEMU+libvirt stack. Recently I haveve decided to actually start using this VM and found that to make it comfortable I need some file sharing between the Linux host and Windows guest. Following article describes how to make working, as simple as possible settup to achieve it.

My configuration is Gentoo Linux as the host and Windows 10 a the guest. It should work similarly on any other recent Linux and also on Windows 7. For managing of the VMs I'm using both commandline (mostly virsh and qemu-img) and  Virtual Machine Manager.  

I expect the libvirt and nfs daemons are already running on your machine and you are familiar with basic usage of these tools.

I hope the description bellow will help somebody to save some time. Just don't ask me about systemd setup, I don't use it.  

First of all what approaches I considered and rejected:

  • Plan 9 file sharing protocol - there is no support on Windows side for that
  • Samba - would work but I wanted something simpler

While exploring, what's possible, I found that Windows are able to use NFS and it also seemed as the most simple solution so I decided to give it a try. To my suprise, it really works, although my setup is very simplified. Steps to achieve that in brief:

  • create directory to be shared and export it as NFS volume
  • anable NFS support in Windows and mount the NFS volume

Creating the Directory and Export It

The location of the directory is quite flexible but should be accessible by the account that will be used for the sharing -- I decided to use good old nobody:

>id nobody
uid=65534(nobody) gid=65534(nobody) groups=65534(nobody)

Create the directory and set the ownership:

>mkdir /mnt/diskx/nfsshare
>sudo chown nobody:nobody /mnt/diskx/nfsshare

Let's expect IP address of Windows VM is 192.168.11.11. You can find the real value for your VM  in Virtual Machine manager when you got to Details and look at NIC settings.  For easier manipulation we give it a name by new record in /etc/hosts:

192.168.11.11 windowsvm

Now we need to export the directory via NFS by adding following line to /etc/exports:

/mnt/disk3/nfsshare/    windowsvm(rw,all_squash,anonuid=65534,anongid=65534)

It will map all the userd ids to our nobody user.

To make the change active, it should be followed by either restarting of the NFS daemon or by executing 'exportfs -ra'.

Mounting the NFS Volume in Windows

Start the Windows VM. To add support for NFS, we must go to "Turn Windows Features on or off" and enable "Services for NFS".


After that we need to use the same anonymous UID and GID as set on server side. For that open regedit, find "Computer\HKEY_LOCAL_MACHINE\SOFTWARE\Microsoft\ClientForNFS\CurrentVersion\Default" and add there two DWORD values named AnonymousUid and AnonymousGid with the same value as used in /etc/exports.


With the IP address of the Linux host set to 10.10.11.11 we can now execute the following command in command.com shell: 

mount -o anon \\10.10.11.11\mnt\diskx\nfsshare Z:

After that the NFS volume should appear as Windows volume "Z:" and we should be able both to read and write to it.

Save the command to a file called mounntfs.bat and keep it for future use. I have it in my home folder in sub-folder named scripts.

Mounting It Automatically on Startup

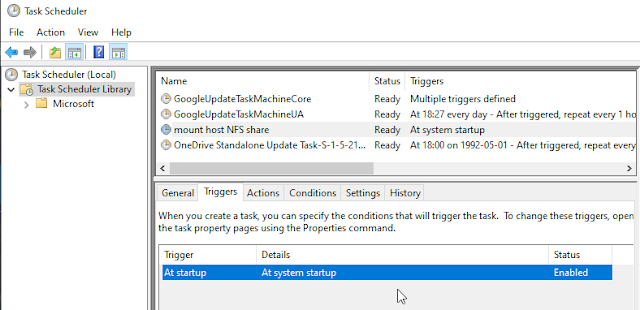
To avoid the necessity to execute the script manually each time you start the VM, you can use Windows Scheduler and create and a scheduled task for that. The desired task in my cas uses SYSTEM account, triggers at startup whenever a network connection is available.


2016/05/02

Preparing Virtual Machine for Virsh Shutdown

One of the a bit tricky things with libvirt is to make guest OS support shutdown command directly, i.e. when you call virsh shutdown ${machine_name} the virtual machine shuts down gracefully and without any delay. 

Libvirt sends the an ACPI (see acpi.info for details)event to virtual machine when shutdown command is issued. Although delivering of ACPI events can be disabled in libvirt configuration, often the problem is that default settings of the most operating systems ignores the events or requires user interaction during their processing. That is undesired behavior for headless automated virtual machines -- below is how to configure some of the currently used operating systems to correctly shutdown when they receive the proper ACPI event. 

note: I intend to update this article when I get experience with any other operating system setup. Feel free to send me yous hands-on as comments.


Ubuntu


  1. install acpid : apt-get install acpid
  2. start it : service acpid start
  3. Add it to default run level:  update-rc.d acpid enable
  4. disable confirmation dialogs by editing /etc/acpi/events/powerbtn
    1. add # to comment line: #action=/etc/acpi/powerbtn.sh
    2. add a new line: action=/sbin/poweroff


Windows Server


  1. change policies
    1. open the Group Policy Editor: gpedit.msc
    2. allow shutdown when an administrator is not logged in
      1. navigate to Local Computer Policy -> Computer Configuration -> Windows Settings -> Security Settings -> Local Policies -> Security Options
      2. find option: “Shutdown: Allow system to be shut down without having to log on” and set it to “Enabled”
    3. disable the “Shutdown Event Tracker” (the dialog that will be presented to the user when a shutdown is requested)
      1. navigate to Local Computer Policy -> Computer Configuration -> Administrative Templates -> System
      2. find option “Display Shutdown Event Tracker” and set it to “Disabled”
  2. set power button to shutdown
    1. open Control Panel
    2. select Power Options
    3. left pane select “Change what the power buttons do” and set it to “shutdown”
  3. disable monitor sleep
    1. open Control Panel
    2. select Power Options, select "Change power-saving settings"
    3. select “High performance”
    4. click on “Change plan settings” and disable monitor sleep by setting "Turn off display" option to 'Never"

2015/01/11

DIY Wi-Fi Access Point on Linux

Hardware

From local vendor I bought PCI Express card with Atheros AR9485 chip complying to IEEE 802.11n. It should be versatile and well-supported via ath9k Linux kernel driver.

In case you are interested in the particular device, it is TP-LINK TL-WN781N.

Kernel 

Naturally you must have some decently recent kernel and enabled support for wireless networking, your Wi-Fi chip and bridging (will be explained later).
The more or less relevant config options on my machine looks this way:

Networking support --->
  Networking options  --->
    <M> 802.1d Ethernet Bridging
  -*- Wireless  --->
        <M> cfg80211 - wireless configuration API
        [*] enable powersave by default
        <M> Generic IEEE 802.11 Networking Stack (mac80211)
        -*- Enable LED triggers
  <M> RF switch subsystem support

Device Drivers  --->
  [*] Network device support  --->
        Wireless LAN  --->
          <M> Atheros Wireless Cards ---->
                      <M> Atheros 802.11n wireless cards support
                      [*] Atheros ath9k PCI/PCIe bus support
  -*- Enable LED triggers -->
        {M} LED Class Support
        -*- LED Trigger support

Bridging Wi-Fi and Ethernet 

To connect clients connecting to our Access Point we need to bridge our existing wired ethernet device eth0 and the wireless one, names wlp1s0 in my case.

Enable IP Forwarding 

Once we have the support in  kernel, we should enable it by default, that is done on Gentoo Linux by editing /etc/sysctl.conf and setting net.ipv4.ip_forward = 1.

You should also install bridge-utils, containing brtctl utility that can be used to query and change setting of ethernet bridges on your machine.

Setup Ethernet Bridge

Then you can adapt your network configuration. I did it by moving all configuration from eth0 to my bridge, called br0, and add eth0 to it at the boot time.  There should also be configuration for the wireless device but we do not want to add it to the bridge on boot - that's what will hostapd take care for.

So my /etc/conf.d/net looks this way after the above described changes:

modules=("ifconfig")

# wired

config_eth0="null"

# wireless

modules_wlp1s0="!iwconfig !wpa_supplicant"
config_wlp1s0="null"
channel_wlp1s0="6"
essid_wlp1s0="MY_SSID"
mode_wlp1s0="master"

# bridge

config_br0="192.168.1.250/24"
routes_br0="default via 192.168.1.254"
dns_servers_br0="192.168.1.250" #pdnsd
bridge_br0="eth0" # adding eth0 to the bridge on boot

Your configuration will probably vary, e.g.  setup of the DNS server, namely using caching DNS server pdnsd, would differ.

Don't forget to add net.br0 to the startup scripts for default run level oor you'll end with machine without network at all.

Access Point

The final piece in the puzzle is hostapd - the utility that attaches to your wireless device and changes it to Wi-Fi AP.  You have to adapt its config (/etc/hostapd/hostapd.conf on my machine) to you needs - make sure  that the settings match what you have in your network configuration:

interface=wlp1s0
bridge=br0
ssid=MY_SSID 
 
I also set country_code in hope that it will help me to meet wireless regulations and hw_mode. For security I set wpa  (set to 2, to avoid weak WPA 1) and wpa_passphrase. All the configuration options are well-documented so take you time and read it - further details are easily available in wikis on internet.

The final set is to test hostapd setup and to add hostapd to startup scripts for default run level. 

Reboot

If you did everything right, you can reboot. Boot will bring up eth0, then br0 and add eth0 to it, the hostapd kicks in bringing up the wireless device and adding it to the bridge - once done, AP starts to advertise itself and you can connect using predefined pass-phrase.

I hope I did not mess things too much as I am newbie to Wi-Fi, and this how-to will help you a bit.

2012/04/09

Using Smart Card as Keystore in Java, signing

This is the promised sequel of the article from September 8th 2011.
It does not represent the only one way how to achieve the desired result, especially when it comes to manipulation with certificates and keys certificate management.

Loading Certificate into the Card


It seems that the easiest approach is to prepare the key store on disk and load it  into the card when ready. For that we use mostly two tools - openssl to transform keys and certificates and keytool to manage the key store.

Create the key store on disk and fill with certificates

Create a private key entry, i.e. a certificate containing a private key, by converting our certificate and private key to PKCS12 format: openssl pkcs12 -export -out cert.p12 -in cert.pem -inkey key.pem

I used org.apache.commons.ssl.KeyStoreBuilder to build a keystore from the p12 file. The password is used both for decryption of private key and encryption of the newly created Java key store. 
java -cp commons-ssl.jar org.apache.commons.ssl.KeyStoreBuilder password cert.p12

Now you can check the content of the file-based key store: keytool -keystore newkeystore.jks -list

Load the file-base key store into the card

keytool -keystore NONE -storetype PKCS11 -providerName SunPKCS11-OpenSC-PKCS11 -importkeystore -srckeystore newkeystore.jks

Check the content of the on-card key store.
keytool -keystore NONE -storetype PKCS11 -providerName SunPKCS11-OpenSC-PKCS11 -list

Signing and Verification with the On-Card Certificate


All the error handling was intentionally removed to make following example shorter. I also skipped creation of PKCS7 signed messages - you can you Bouncy Castle CMSSignedDataGenerator for that easily.

import java.security.*;
import java.security.cert.*;
import java.security.cert.Certificate;
import java.io.*;

...

// loading the key from file:
KeyStore keyStore = KeyStore.getInstance("JCEKS");
FileInputStream inputStream = new FileInputStream(storeFileName);
keyStore.load(inputStream, storePassword.toCharArray());
KeyStore.ProtectionParameter protectParameter = new KeyStore.PasswordProtection(certPass.toCharArray()); }

// loading the key from token:
KeyStore keyStore = KeyStore.getInstance("PKCS11");
KeyStore.ProtectionParameter protectParameter = null;
keyStore.load(null, storePassword.toCharArray());

// the rest does not depend on the type of the store: 
String signatureAlgorithmName = "SHA1withRSA";
KeyStore.Entry entry = keyStore.getEntry(alias, protectParam);
boolean isPrivateKeyEntry = keyStore.entryInstanceOf(alias, KeyStore.PrivateKeyEntry.class);
if (isPrivateKeyEntry)
{
  Signature signatureAlgorithm = Signature.getInstance(signatureAlgorithmName);

  // signing
  KeyStore.PrivateKeyEntry privateKeyEntry = (KeyStore.PrivateKeyEntry)entry;
  PrivateKey privateKey = privateKeyEntry.getPrivateKey();  
  signatureAlgorithm.initSign (privateKey);
  signatureAlgorithm.update (message);
  byte[] signature = signatureAlgorithm.sign();

  // verification
  Certificate[] chain = privateKeyEntry.getCertificateChain();
  X509Certificate certificate = (X509Certificate) chain[chain.length-1];
  PublicKey publicKey = certificate.getPublicKey();
  signatureAlgorithm.initVerify(publicKey);
  signatureAlgorithm.update (data);
  boolean verified = signatureAlgorithm.verify(signature);
}

2011/09/18

Using Smart Card as Keystore in Java, setup

Using a smart card as a key store promises stronger security compared to storing keys or certificates on a disk. This can be further improved by using a card reader with a PIN pad, an effective counter-measure against key loggers.

This article should provide basic information how to use smart card as key store for Java applications. You do not need an expensive card for such application - a cheaper, specialized crypto-card will do. The installation instructions in this article focus on Linux, as it is my preferred platform and the setup a bit more complicated than on Windows.

The stack

                 application
                      |
           java.security.Keystore
                      |
                     JVM
                      |
                PKCS11 provider
                      |
              PC/SC middleware
                      |
                    CCID
                      |
            USB smart card reader
                      |
                 smart card 

Installing Software
  1. Download a driver for your smart card reader from its producer's page and install it.
  2. Download and install PC/SC middleware - PCSC-Lite. It does not require  any configuration if you use USB reader.
  3. Get PKCS11 provider for your card. You can use open-source (OpenSC) or producer 's implementation, depending on which one works better with Java.

Setting PKCS11 Token for Java 

First you have to configure PKCS11 provider for Java. Open $JAVA_HOME/jre/lib/security/java.security and look for registered security providers - find lines starting with text security.provider. Add a new security provider by adding line security.provider.9=sun.security.pkcs11.SunPKCS11 /etc/pkcs11_java.cfg . Sun PKCS#11 provider allows integration of PKCS11 tokens with Java platform by interfacing a native library, usually delivered by the token producer.

The configuration file following the provider's fully qualified name may contain various PKCS11 settings. It usually contains only the three lines we can see in this setting for OpenSC:

name = OpenSC-PKCS11
description = SunPKCS11 via OpenSC
library = /usr/lib/opensc-pkcs11.so

The entry name serves as name of the PKCS11 provider and description is AFAIK optional. The most important is the library property, it contains a path to the PKCS11 implementation we want to use. 

Depending on environment in which the application will be used we would need  need to create a custom security policy,  the name of the provider is prefixed with "SunPKCS11-" :

grant { 
       permission java.security.SecurityPermission
       "authProvider.SunPKCS11-OpenSC-PKCS11";
 };


In the second part we will see how to create key and certificate, load them into the card and use the key on card to sign and verify.