I have a Linux workstation and created a Windows virtual machine in it, running on KVM+QEMU+libvirt stack. Recently I haveve decided to actually start using this VM and found that to make it comfortable I need some file sharing between the Linux host and Windows guest. Following article describes how to make working, as simple as possible settup to achieve it.
My configuration is Gentoo Linux as the host and Windows 10 a the guest. It should work similarly on any other recent Linux and also on Windows 7. For managing of the VMs I'm using both commandline (mostly virsh and qemu-img) and Virtual Machine Manager.
I expect the libvirt and nfs daemons are already running on your machine and you are familiar with basic usage of these tools.
I hope the description bellow will help somebody to save some time. Just don't ask me about systemd setup, I don't use it.
First of all what approaches I considered and rejected:
- Plan 9 file sharing protocol - there is no support on Windows side for that
- Samba - would work but I wanted something simpler
While exploring, what's possible, I found that Windows are able to use NFS and it also seemed as the most simple solution so I decided to give it a try. To my suprise, it really works, although my setup is very simplified. Steps to achieve that in brief:
- create directory to be shared and export it as NFS volume
- anable NFS support in Windows and mount the NFS volume
Creating the Directory and Export It
The location of the directory is quite flexible but should be accessible by the account that will be used for the sharing -- I decided to use good old nobody:
>id nobody
uid=65534(nobody) gid=65534(nobody) groups=65534(nobody)
Create the directory and set the ownership:
>mkdir /mnt/diskx/nfsshare
>sudo chown nobody:nobody /mnt/diskx/nfsshare
Let's expect IP address of Windows VM is 192.168.11.11. You can find the real value for your VM in Virtual Machine manager when you got to Details and look at NIC settings. For easier manipulation we give it a name by new record in /etc/hosts:
192.168.11.11 windowsvmNow we need to export the directory via NFS by adding following line to /etc/exports:
/mnt/disk3/nfsshare/ windowsvm(rw,all_squash,anonuid=65534,anongid=65534)
It will map all the userd ids to our nobody user.
To make the change active, it should be followed by either restarting of the NFS daemon or by executing 'exportfs -ra'.
Mounting the NFS Volume in Windows
Start the Windows VM. To add support for NFS, we must go to "Turn Windows Features on or off" and enable "Services for NFS".


After that we need to use the same anonymous UID and GID as set on server side. For that open regedit, find "Computer\HKEY_LOCAL_MACHINE\SOFTWARE\Microsoft\ClientForNFS\CurrentVersion\Default" and add there two DWORD values named AnonymousUid and AnonymousGid with the same value as used in /etc/exports.

With the IP address of the Linux host set to 10.10.11.11 we can now execute the following command in command.com shell:
mount -o anon \\10.10.11.11\mnt\diskx\nfsshare Z:
After that the NFS volume should appear as Windows volume "Z:" and we should be able both to read and write to it.
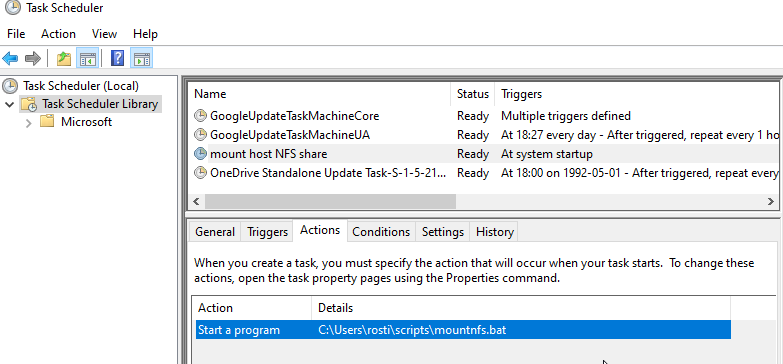
Save the command to a file called mounntfs.bat and keep it for future use. I have it in my home folder in sub-folder named scripts.
Mounting It Automatically on Startup
To avoid the necessity to execute the script manually each time you start the VM, you can use Windows Scheduler and create and a scheduled task for that. The desired task in my cas uses SYSTEM account, triggers at startup whenever a network connection is available.


No comments:
Post a Comment